
Chat GPT Prompt for Photo Editing: 15 Useful Prompts and a Better Way to Write Them
A good chat gpt prompt for photo editing does three things at once: it says what to change, what to preserve, and how the final photo should be used. If you only ask for "aesthetic," "viral," or "cinematic," the result may look polished but lose the face, outfit, lighting logic, or pose that made the original photo worth editing.
Use this simple structure before you copy any prompt:
- Edit type: portrait retouch, fashion editorial, collage, flash photo, restoration, product-style shot, avatar, or background change.
- Preserve rules: face, skin tone, hair, expression, pose, body shape, outfit, camera angle, and anything else that must remain recognizable.
- Visible style evidence: lighting, color palette, lens feel, background, texture, props, and mood.
- Composition: crop, subject placement, number of panels, negative space, and aspect ratio.
- Boundaries: no face swap, no extra fingers, no readable text, no logos, no watermark, no heavy skin smoothing.
That is the difference between random chatgpt photo editing prompts and prompts you can reuse across portraits, social posts, profile photos, and image generator workflows.
The Best Chat GPT Prompt for Photo Editing Template
Copy this template when you want control rather than a one-off lucky result:
"Edit the uploaded photo into [specific photo style]. Preserve [identity and details that must stay the same]. Change only [specific elements]. Add [visible style evidence such as lighting, color, texture, background, props, and camera feel]. Compose the image as [crop, layout, or aspect ratio]. Keep the result [realistic, editorial, playful, cinematic, natural]. Avoid [distortions, extra limbs, over-smoothed skin, changed face, readable text, logos, watermark, unwanted objects]."
Here is the same template filled in for a portrait:
"Edit the uploaded photo into a cinematic editorial portrait. Preserve the exact facial identity, skin tone, hairstyle, expression, body proportions, pose, and main outfit. Change only the lighting, background mood, color grade, and polish. Add soft side lighting, realistic skin texture, shallow background blur, warm highlights, gentle film grain, and a clean portrait crop. Keep it realistic and professional. Avoid face reshaping, plastic skin, extra accessories, readable text, logos, and watermark."
The prompt is longer than a viral caption, but it gives the model less room to invent the wrong things.
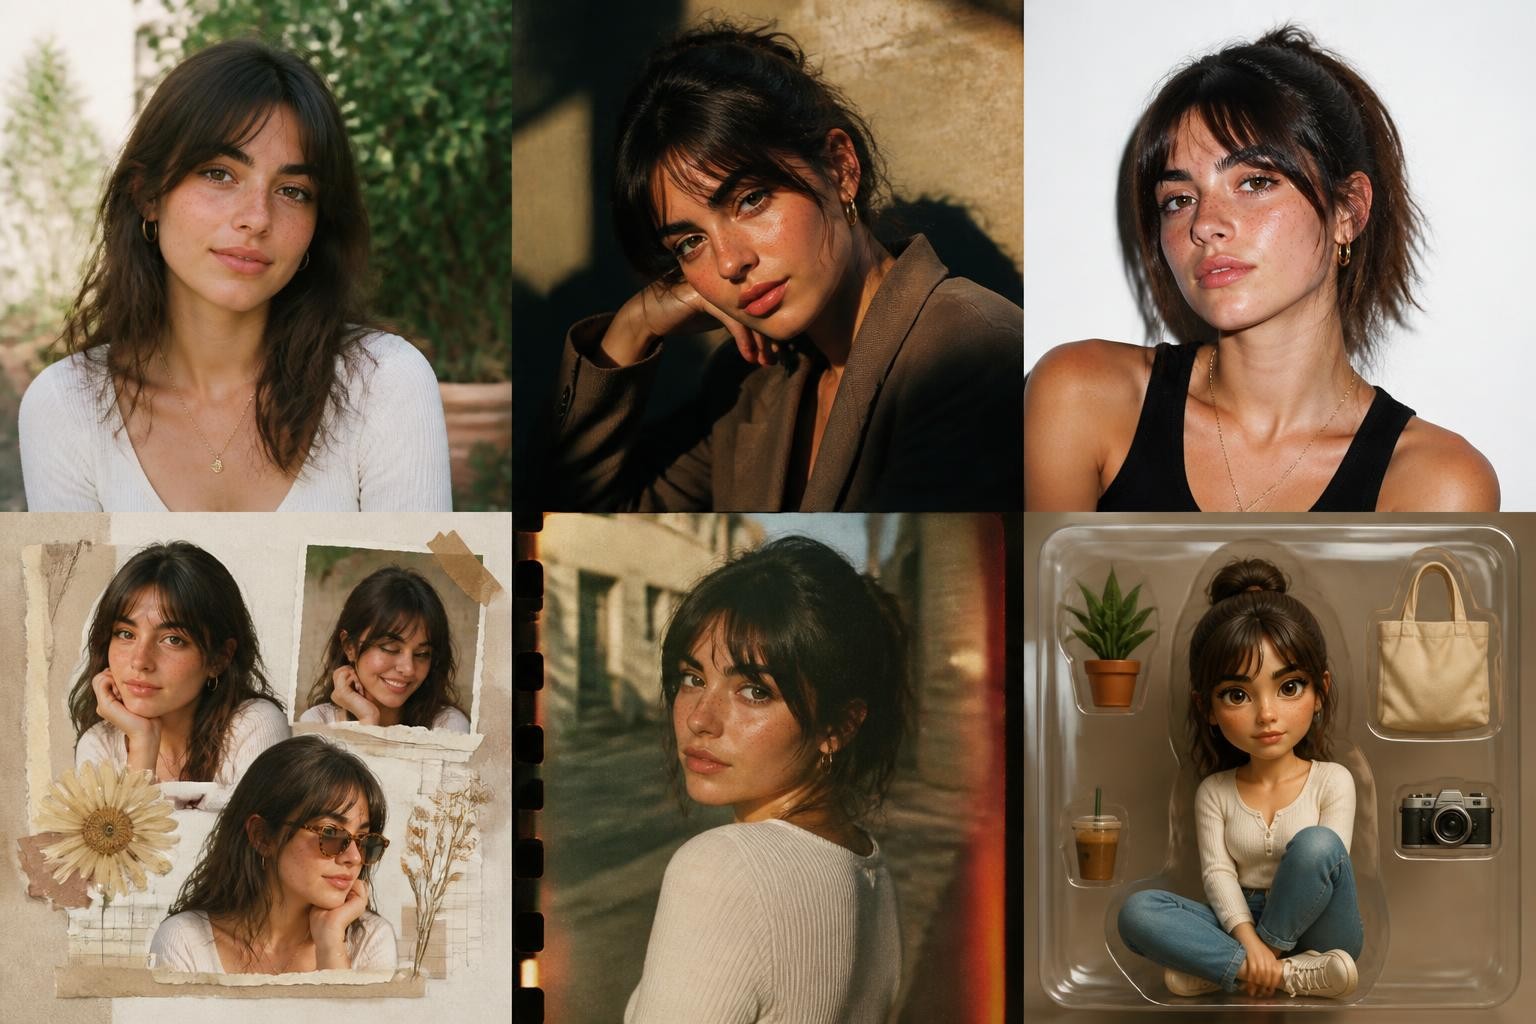
15 Copy-Ready ChatGPT Photo Editing Prompts
These prompts are adapted from the prompt styles people are searching for most: cinematic portraits, flash photos, scrapbook collages, fashion edits, old-photo restoration, makeup and hairstyle previews, couple photos, toy-style avatars, and polished social images. Replace bracketed details before using them.
1. Natural Portrait Upgrade
"Edit this photo into a clean, natural portrait. Preserve my exact face, skin tone, hairstyle, expression, body proportions, outfit, and camera angle. Improve only the lighting, background softness, color balance, and overall clarity. Use natural skin texture, soft shadows, realistic eyes, and a subtle professional finish. Do not reshape my face, change my age, over-smooth skin, add makeup, add text, or change the clothing."
Use this first if the photo already looks good and only needs polish.
2. Cinematic Editorial Portrait
"Turn this image into a cinematic editorial portrait. Keep the same person, face, expression, hair, pose, and outfit. Add dramatic but believable side lighting, a softly blurred background, warm highlights, deep but clean shadows, gentle film grain, and a high-end camera look. The final image should feel like a magazine portrait, not fantasy art. No face swap, no beauty filter look, no readable text, no watermark."
This is the safest all-purpose style when you want a strong profile or social post.
3. Direct Flash Instagram Photo
"Edit the uploaded photo with a direct-flash night photography look. Preserve the person exactly, including face, hair, clothing, body shape, and pose. Add realistic flash highlights, crisp subject edges, darker background shadows, slight background motion softness, natural skin texture, and a candid early-digital-camera mood. Keep the face sharp and recognizable. Do not add red-eye, heavy blur, fake timestamp text, logos, or watermark."
This works best for casual photos, nightlife shots, street portraits, and creator posts.
4. Moody Scrapbook Collage
"Create a moody scrapbook-style collage from this photo. Use one main portrait and three smaller supporting frames from the same person, such as a side profile, eye detail, and outfit detail. Preserve the exact identity, skin tone, hairstyle, expression style, and outfit colors across every frame. Add layered paper textures, taped photo edges, soft floral details, warm amber lighting, subtle grain, and a handmade magazine mood. No readable text, no logos, no extra faces."
Collage prompts fail when the model invents multiple versions of a person. The "same person across every frame" line helps reduce identity drift.
5. Vintage Magazine Collage
"Transform this portrait into a vintage fashion magazine collage. Preserve the subject's face, pose, hairstyle, skin tone, and outfit identity. Build a layered editorial composition with torn paper edges, analog print texture, muted color blocks, soft grain, realistic shadows, and one large portrait as the visual anchor. Add small abstract design shapes, but no readable letters, numbers, brand marks, or fake headlines."
Use this when you want a more designed visual without asking the model to create messy fake typography.
6. Old Photo Restoration
"Restore this old photo while preserving the original person, expression, clothing style, and historical character. Remove scratches, stains, folds, dust marks, and faded patches. Recover facial details naturally without changing identity. Improve clarity, contrast, and sharpness gently. If colorizing, use believable skin tone, hair color, clothing color, and background color based on the image context. Keep it respectful and realistic, not modernized or glamorized."
For family photos, keep the tone careful. Do not ask for a celebrity-style makeover unless that is truly the goal.
7. Polaroid Memory Edit
"Edit this photo into a nostalgic instant-film memory. Preserve the same people, faces, body proportions, clothing, pose, and emotional expression. Add soft flash, gentle film grain, slightly faded colors, warm highlights, natural blur in the background, and a candid photo feel. Keep the image realistic and personal. Do not add readable captions, dates, logos, or extra people."
This is a beginner-friendly chat gpt photo editing prompt because the style is forgiving and does not require a complex new scene.
8. iPhone-Style Everyday Photo
"Make this image look like a realistic candid photo taken on a modern phone. Preserve the same face, pose, outfit, skin tone, hairstyle, and background structure. Improve exposure, color balance, subject sharpness, and background depth while keeping the image casual and unposed. Avoid studio lighting, heavy retouching, artificial glamour, changed facial features, fake text, and watermark."
Use this when you want the result to look believable rather than obviously AI.
9. Luxury Car Fashion Shoot
"Edit the person in this photo into a realistic luxury street fashion shoot beside a sleek car. Preserve the exact facial identity, hair, body shape, pose energy, and main outfit colors. Add golden-hour city light, polished reflections, shallow depth of field, realistic shadows, and confident editorial styling. The car should support the scene, not cover the subject. Do not change the face, add brand logos, add readable license plates, or create unrealistic body proportions."
This prompt borrows the high-status visual language of car-and-fashion edits but adds controls that keep it from becoming fake-looking.
10. Beach Vacation Editorial
"Turn this photo into a relaxed beach vacation editorial. Keep the same person, face, expression, skin tone, hair, body proportions, and outfit identity. Add warm sunset light, soft ocean background, gentle wind movement in hair or fabric, natural shadows, and a clean travel-photo composition. Make it bright and cinematic but realistic. Do not change the face, add luxury brand logos, make skin plastic, or invent extra people."
Good for fashion, travel, and lifestyle images where the environment should feel aspirational but still believable.
11. Traditional Fashion Portrait
"Edit this portrait into a respectful traditional fashion editorial. Preserve the person's exact face, skin tone, expression, hairstyle, body proportions, and pose. Add elegant fabric texture, soft warm lighting, realistic jewelry or accessory detail only if it fits the scene, a clean background, and natural shadows. Keep the styling graceful and believable. Avoid caricature, exaggerated beauty retouching, changed body shape, readable text, logos, and watermark."
Use this for saree-inspired, formalwear, cultural, or ceremonial styling. Keep the wording respectful and specific.
12. Makeup Style Preview
"Create a realistic makeup style preview using this portrait. Preserve the same face shape, facial features, skin tone, hair, expression, and pose. Apply [natural/glam/editorial] makeup with realistic skin texture, balanced foundation, flattering eye detail, and lip color that suits the lighting. Keep the result like a real photo, not a beauty filter. Do not change facial structure, lighten or darken skin unrealistically, add text labels, or over-smooth skin."
If you are comparing several looks, generate them one at a time. Multi-look grids can drift.
13. Hairstyle Preview
"Preview a [short bob/soft waves/layered cut/bangs/long curls] hairstyle on the person in this photo. Preserve the exact face, skin tone, expression, pose, body shape, clothing, and camera angle. Change only the hairstyle. Make the hair texture, hairline, lighting, and shadows realistic. Keep the result suitable for deciding whether the hairstyle fits. Do not change the face, add makeup, change clothing, or invent a new background."
Hairstyle prompts need a strict "change only the hairstyle" rule because the model may otherwise redesign the whole portrait.
14. Black-and-White Couple Film Still
"Edit this couple photo into a timeless black-and-white film still. Preserve both people's exact identities, faces, expressions, body proportions, pose relationship, and clothing. Add classic cinematic contrast, soft directional light, realistic film grain, gentle background depth, and an emotional but natural mood. Keep the image photorealistic. Do not merge faces, change either person, add readable text, logos, or extra people."
For couple photos, preserve each person separately. Saying "both people" is not enough.
15. Stylized 3D Collectible Figure
"Transform the person in this photo into a stylized 3D collectible figure while preserving recognizable hairstyle, outfit colors, key accessories, and general personality. Use a clean studio toy-photography setup, soft reflections, miniature props, and friendly stylization. Keep the figure charming, polished, and not uncanny. Do not use branded packaging, readable text, logos, realistic celebrity resemblance, or a changed identity."
Toy prompts are fun, but they are not the best choice for professional headshots, product pages, or serious personal branding.
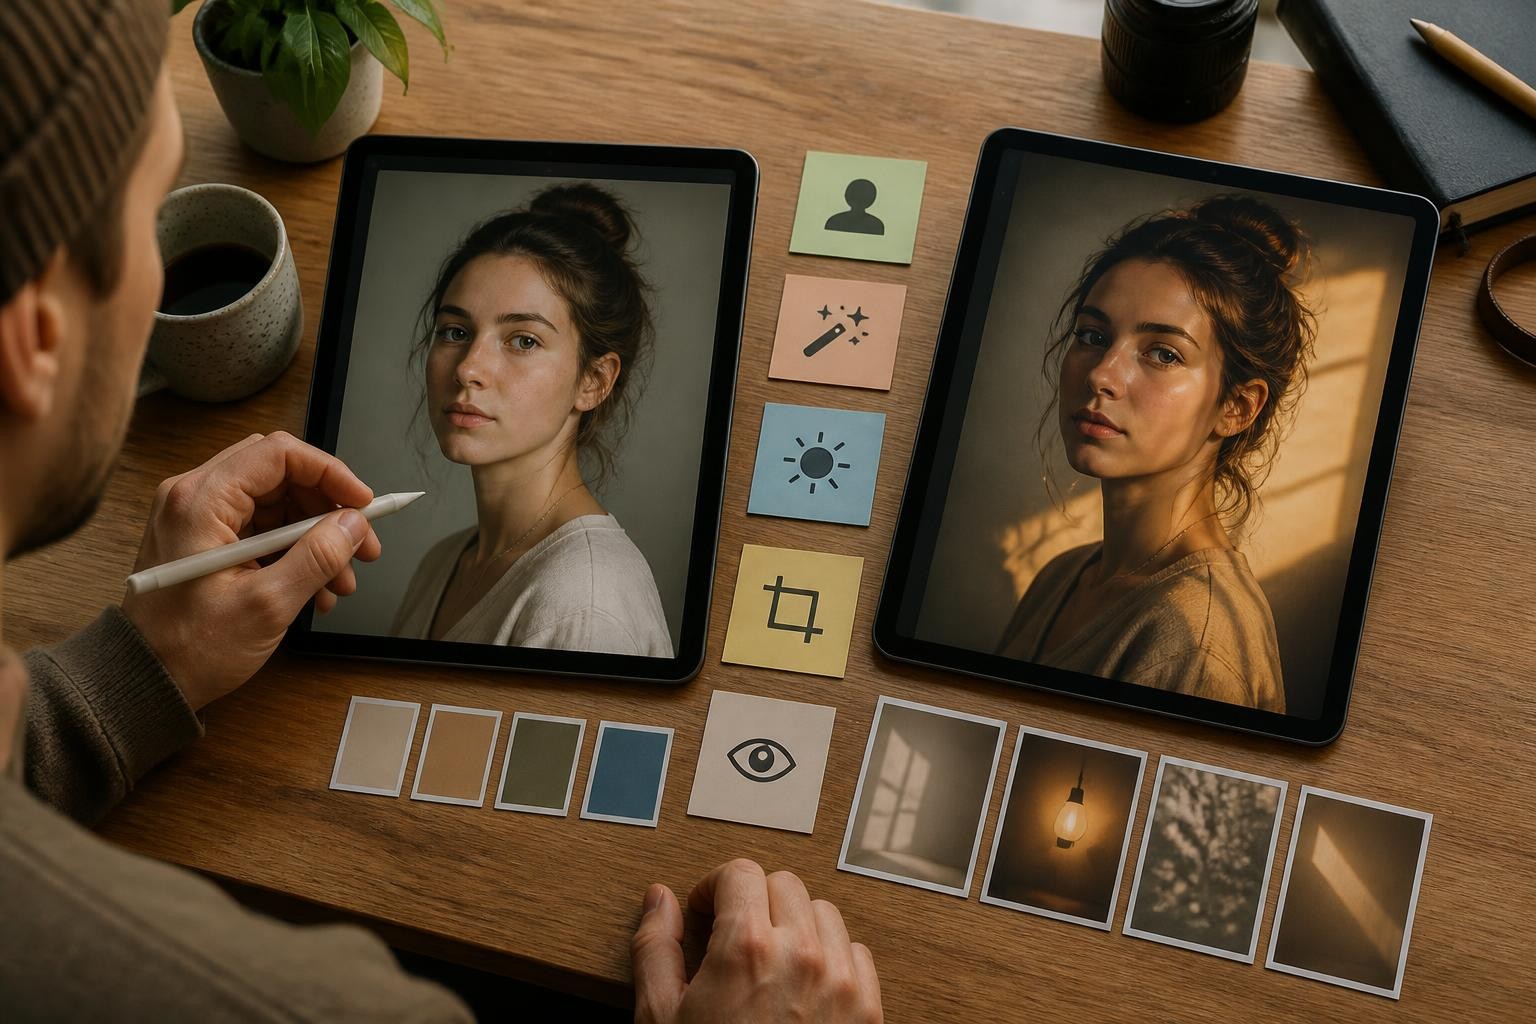
How to Use These Prompts in ChatGPT or an AI Image Generator
Step 1. Start with a clear source photo
Use the cleanest photo you have. A prompt cannot reliably preserve identity if the face is tiny, blurred, covered, low light, heavily filtered, or cropped at the edge. For portraits, the best starting image usually has a visible face, simple pose, and enough background for the edit to breathe.
Before uploading, decide whether the image is safe to use. Avoid sensitive documents, private surroundings, other people's photos without permission, and images where a realistic edit could mislead viewers.
Step 2. Choose one editing job
Do not ask for a new outfit, new background, new hairstyle, new makeup, new pose, and new camera angle in one prompt unless you want a full transformation. The more changes you request, the more likely the model is to reinterpret the whole image.
Use this decision:
- Small fix: ask for exposure, color, background blur, cleanup, or retouching.
- Style edit: ask for cinematic, flash, Polaroid, vintage, editorial, or magazine looks.
- Transformation: ask for collage, toy figure, fashion set, or scene rebuild.
- Preview: ask for hairstyle, makeup, clothing, or color comparison.
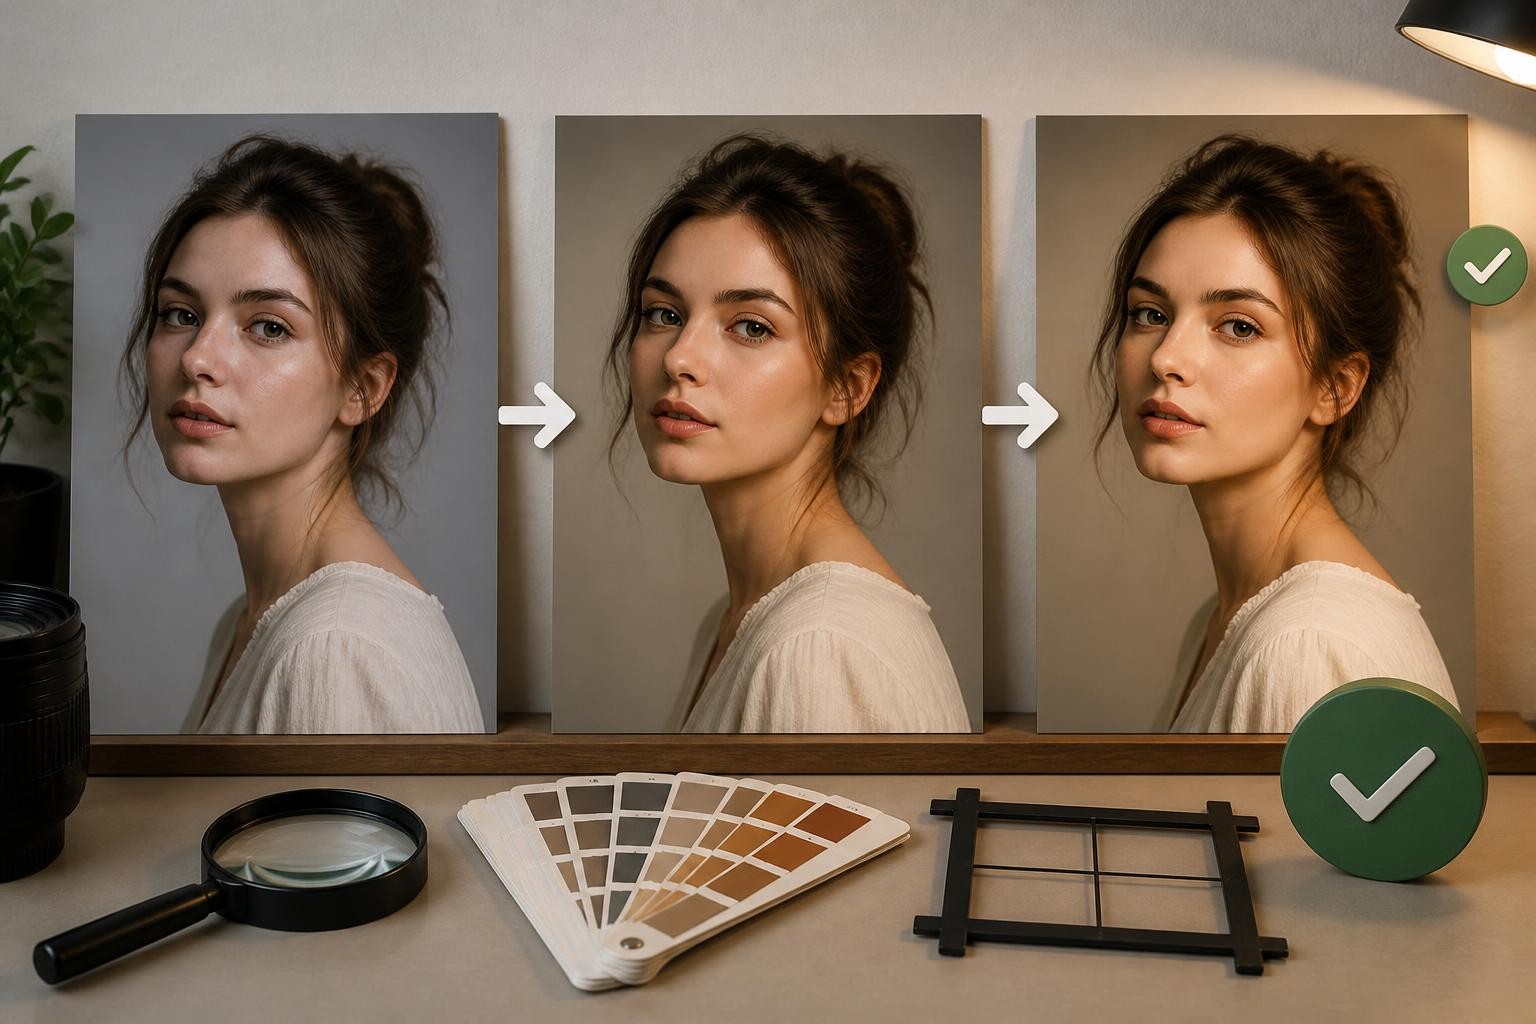
Step 3. Put preservation before style
For personal photos, the preservation sentence should come before the creative sentence.
Weak:
"Make this photo look cinematic and expensive."
Better:
"Preserve my exact face, expression, hair, skin tone, body proportions, pose, and outfit. Then edit the photo into a cinematic editorial portrait with soft side lighting, subtle film grain, and a clean background."
The better prompt tells the model what it is not allowed to sacrifice.
Step 4. Add style evidence instead of style labels
Labels are useful, but visible details are better. "Cinematic" could mean low-key studio light, sunset backlight, neon rain, shallow focus, or glossy fashion lighting.
Use details such as:
- Lighting: soft side light, direct flash, golden hour, overcast daylight, rim light.
- Color: warm amber, muted film tones, black and white, pastel, high contrast.
- Texture: film grain, paper collage, glossy reflections, natural skin texture.
- Composition: close portrait, waist-up crop, full body, main image plus three smaller panels.
- Camera feel: candid phone photo, editorial portrait, instant film, magazine spread.
Step 5. Review the output like an editor
Do not accept the first result just because it looks impressive. Check:
- Does the face still look like the same person?
- Did the body shape, age, skin tone, or expression change?
- Are hands, eyes, teeth, hairline, and accessories coherent?
- Did the model add unreadable text, logos, fake watermarks, or odd symbols?
- Does the background match the subject's lighting?
- Is the crop right for your final use?
If one thing is wrong, repair one thing at a time.
Fix Bad Results with Follow-Up Prompts
The fastest improvement usually comes from targeted correction, not rewriting the whole prompt.
If the face changed
"Revise the image while restoring the original face more closely. Preserve the uploaded person's facial features, eye shape, nose, mouth, jawline, skin tone, expression, and age. Keep the current lighting and style, but remove any face reshaping or beautification."
If the image looks too artificial
"Make the result more like a real photograph. Reduce plastic skin, excessive sharpness, unrealistic glow, and fantasy lighting. Keep natural texture, believable shadows, slight lens softness, and realistic color."
If the background changed too much
"Keep the original background structure and camera angle. Only improve lighting, color, and depth. Do not replace the location or invent new objects."
If the model added messy text
"Remove all readable text, letters, numbers, logos, signs, labels, and watermark-like marks. Keep the design visual-only with shapes, texture, and composition instead of typography."
If a collage has inconsistent faces
"Make every portrait panel clearly represent the same person from the uploaded photo. Keep the same face, skin tone, hairstyle, age, and expression style across all panels. Reduce variation between frames."
If the edit changed too many things
"Undo unnecessary changes. Preserve the original face, pose, outfit, background layout, and camera angle. Apply only [specific change] while keeping everything else close to the source photo."
Common Mistakes That Make Chat GPT Photo Editing Prompts Worse
Asking for quality words instead of instructions
"4K," "ultra realistic," and "high quality" can help a little, but they do not explain the edit. One clear lighting instruction is usually more useful than five generic quality words.
Forgetting the negative constraints
If your prompt does not say "no readable text," a collage or toy-package prompt may create fake letters. If it does not say "do not change the face," a fashion prompt may beautify the person into someone else.
Mixing incompatible styles
"Natural iPhone candid, cinematic studio lighting, neon cyberpunk, luxury magazine, Polaroid film" is too many directions. Pick one primary style and one supporting texture.
Asking for several versions in one image
Color analysis grids, hairstyle comparisons, and makeup comparisons are tempting, but multi-panel images can reduce face consistency. If identity matters, generate one version per prompt and compare them yourself.
Treating prompts as magic instead of workflow
The first prompt sets direction. Follow-up prompts do the editing. Save the best result, then make smaller corrections until the image is usable.
Which Prompt Should You Start With?
If you are new, start with the Natural Portrait Upgrade or Polaroid Memory Edit. They preserve the original image and have a lower risk of identity drift.
If you want a social post, try Cinematic Editorial Portrait, Direct Flash Instagram Photo, or Moody Scrapbook Collage.
If you want a practical preview, use the Makeup Style Preview or Hairstyle Preview, but keep the requested change narrow.
If you want a dramatic trend result, use the Luxury Car Fashion Shoot, Beach Vacation Editorial, Traditional Fashion Portrait, or Stylized 3D Collectible Figure. These are more fun, but they also need stricter boundaries.
The best chat gpt photo editing prompts are not the longest. They are the clearest about what should stay real.
Final Prompt Checklist
Before you paste a prompt, make sure it answers these questions:
- What is the exact edit style?
- What parts of the source photo must stay unchanged?
- What visible details prove the style?
- What should the composition look like?
- What should the model avoid?
- Where will the final image be used?
Here is the compact version:
"Preserve [identity]. Change [specific thing]. Add [visible style evidence]. Compose for [format]. Avoid [failure points]."
That one sentence can turn scattered chat gpt photo editing prompts into a reliable editing system.
To turn one of these prompts into a finished image, open SoraLum's generator, upload or describe your idea, and start with a controlled prompt that protects the parts of the photo that matter. Try it with chat gpt prompt for photo editing and refine the result one change at a time.